
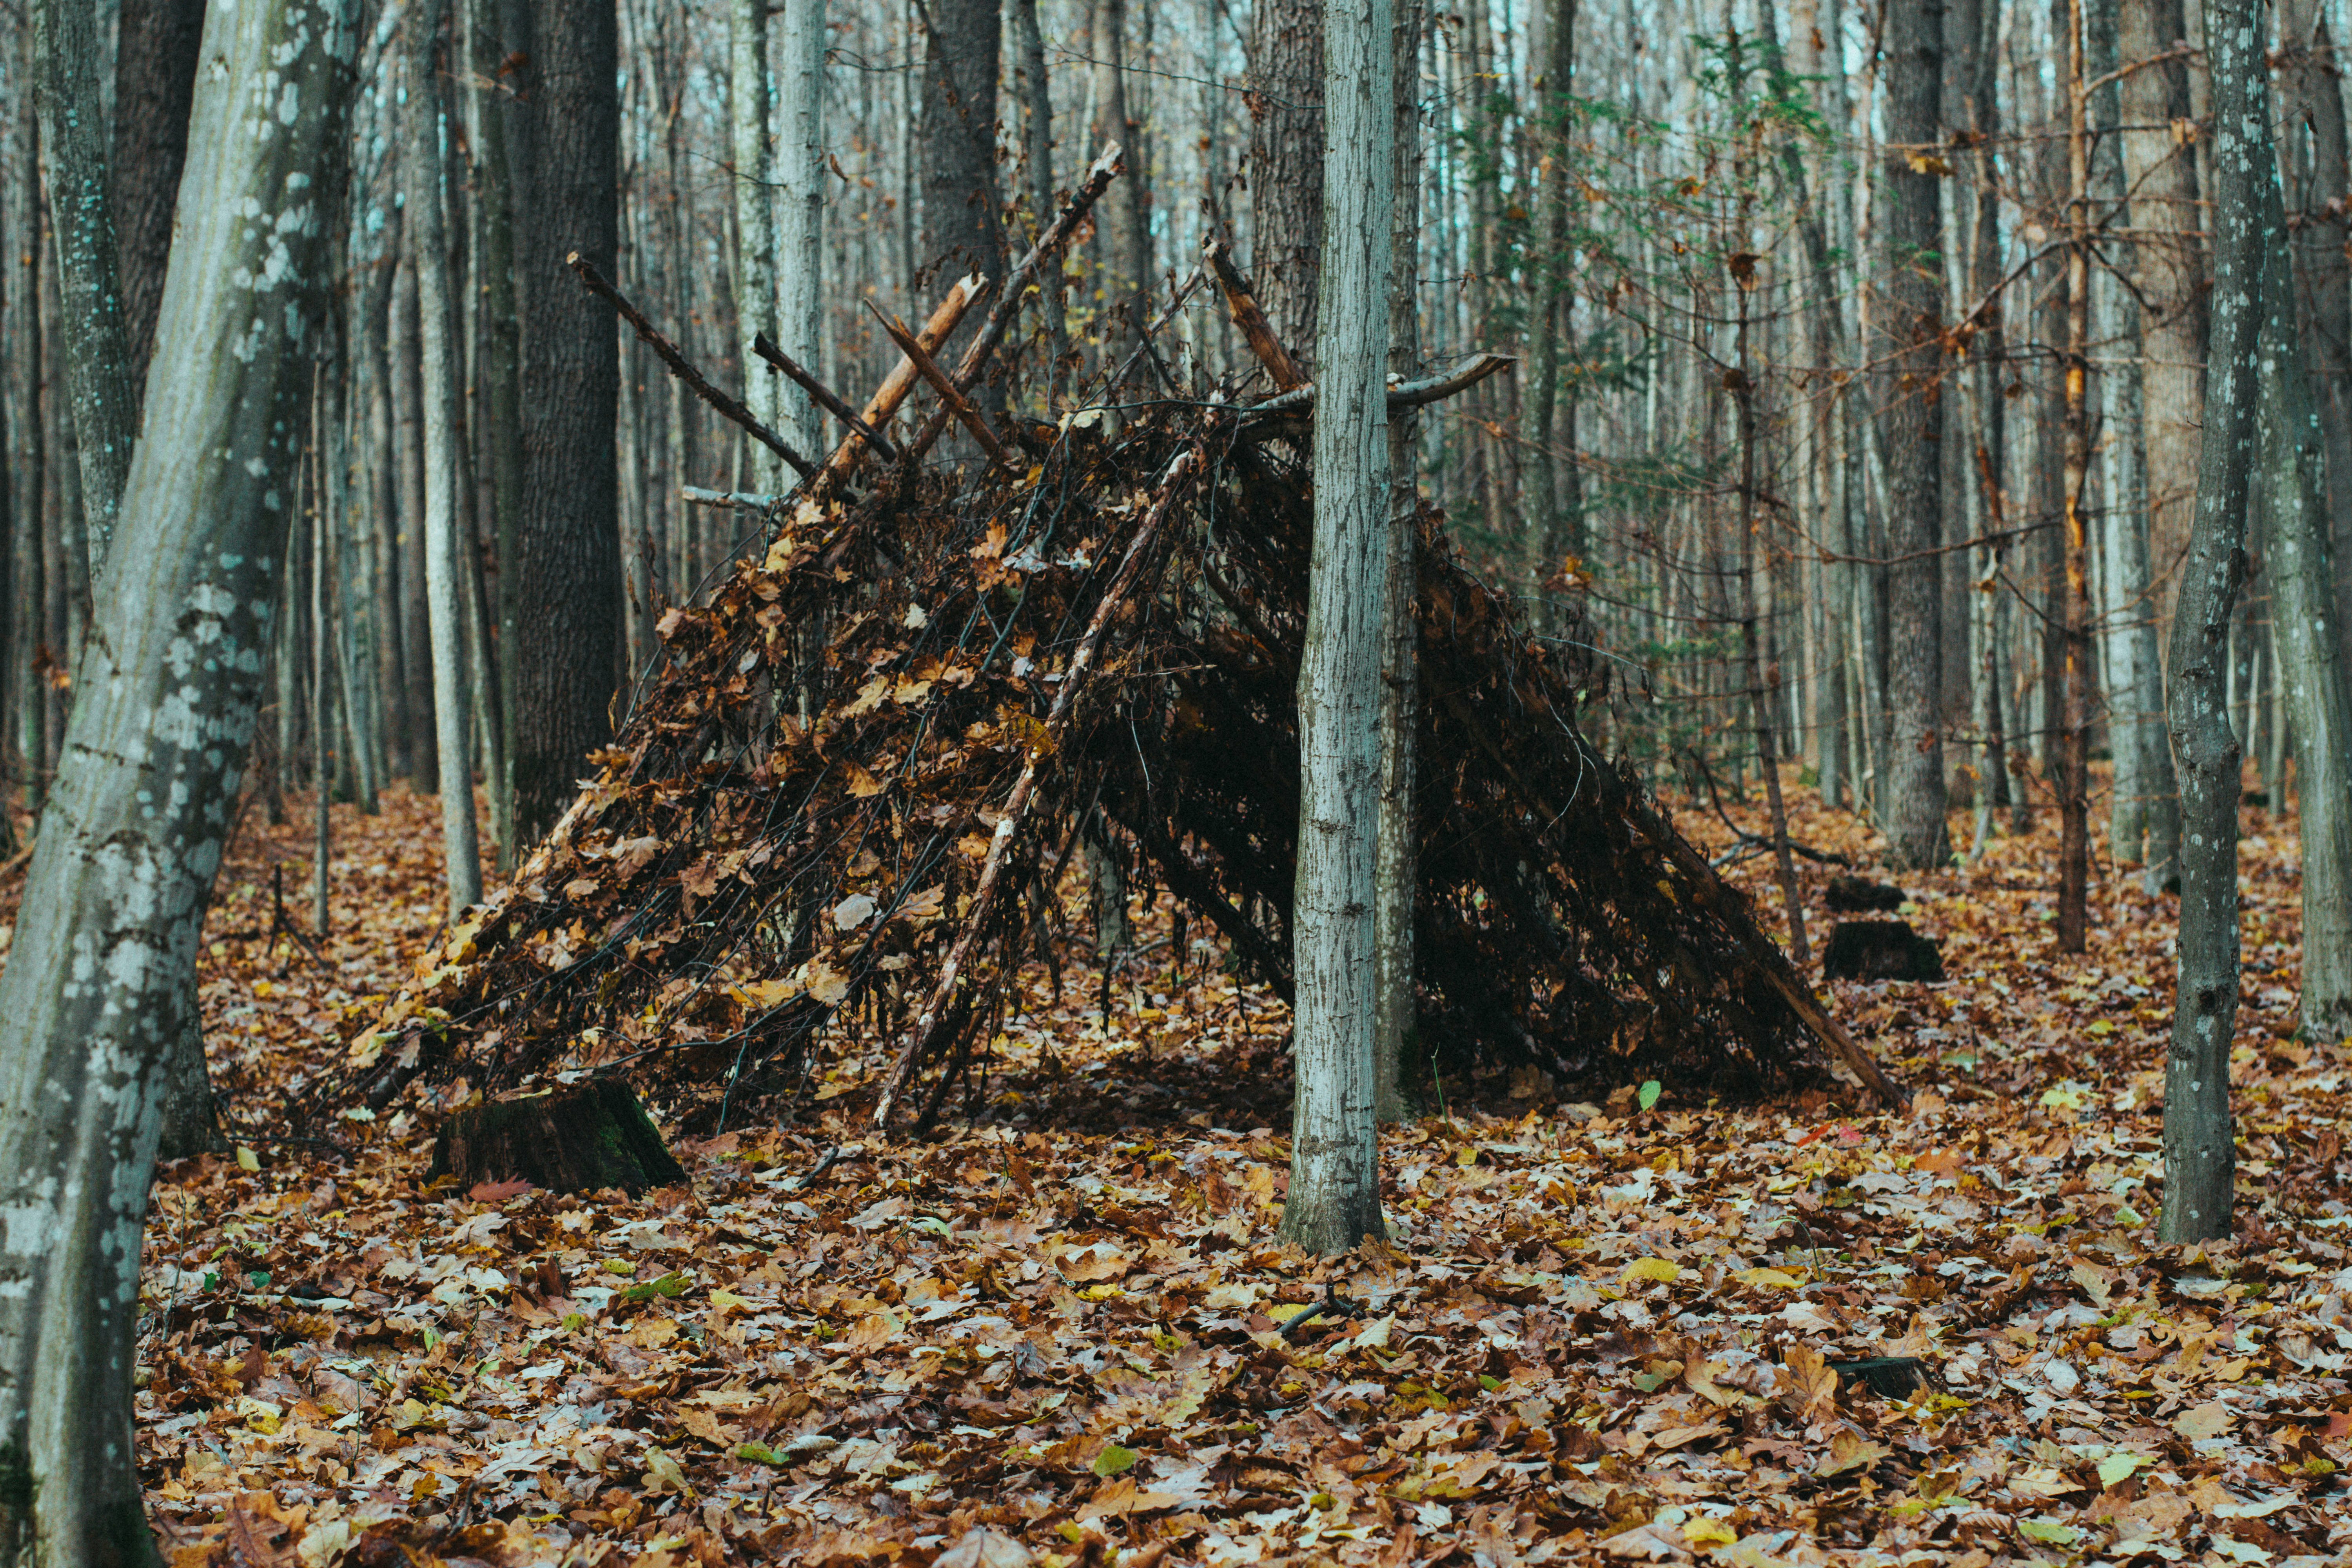
When you find yourself dealing with an unexpected outdoor emergency, after making sure you are safe, the most important step is picking the right place for your shelter. This is not simply about finding a level area; it is about making a smart choice that will greatly affect your ability to stay warm, dry, & protected. You need to think ahead, always considering the weather and possible dangers.
**Identifying a Safe and Strategic Site**
Look for a dry, well-drained, and elevated area.
Imagine a heavy rain—you definitely do not want to be in a low spot where water can pool. Flooding is a real threat, & even ongoing dampness can cause hypothermia. Seek out natural features that offer cover, like large rocks, thick groups of trees, or the bottom of a rock overhang (as long as it is secure!). Steer clear of places prone to flash flooding, such as creek beds or dry washes, even if they seem like good shelter at first glance.
When preparing for outdoor adventures, understanding the essentials of building an emergency shelter is crucial for survival. A related article that can enhance your preparedness is about selecting the right tactical backpack, which can be vital for carrying your survival gear efficiently. You can read more about it in this article: How to Choose a Tactical Backpack. This resource provides insights into choosing a backpack that can hold all the necessary tools and supplies for constructing a shelter and ensuring your safety in the wilderness.
Beyond water, you must watch out for dangers above you. Check for dead branches, sometimes called “widowmakers,” that could fall without warning, especially during wind or rain. Also, in rocky areas, look for loose rocks or scree slopes overhead. If there is any risk of an avalanche where you are, move to higher, safer ground.
While you look around, be alert for poison ivy, poison oak, or other irritating plants that could cause discomfort or worse. Finally, and importantly, watch for animal dens. Disturbing an animal’s home can lead to a risky encounter. Look for clues like tracks, droppings, or dug-out burrows.
**Leveraging Natural Protection & Orientation**
Once you have a generally safe spot, adjust its placement to get the most protection from the weather.
Many experienced survivalists suggest putting your shelter on the lee side of incoming weather. This means you want to position it so that the main wind & rain hit the back or a naturally stronger side, while the opening faces away from the storm’s force. In cold conditions, staying warm becomes your main focus. Here, an open southern exposure is very helpful. The sun’s rays are strongest from the south, and placing your shelter to catch that warmth can make a big difference, especially during the day.
When planning to build an emergency shelter outdoors, it’s essential to consider the right gear and techniques to ensure your safety and comfort. A great resource for understanding what you might need is an article that discusses must-have gear for desert hiking. This guide can provide valuable insights into the equipment that can enhance your outdoor experience and help you prepare for unexpected situations. For more information, check out the article on must-have gear for desert hiking.
| Metric | Description | Recommended Value/Range | Notes |
|---|---|---|---|
| Location Selection | Distance from hazards (water, cliffs, unstable ground) | Minimum 50 meters from water sources and unstable terrain | Prevents flooding and landslides |
| Shelter Size | Space per person inside shelter | Minimum 2 square meters per person | Allows for comfort and movement |
| Insulation Thickness | Layer thickness of insulating materials (leaves, branches, etc.) | At least 10 cm thick | Improves heat retention |
| Ventilation | Number of ventilation openings | At least 1 small vent (10-15 cm diameter) | Prevents condensation and allows airflow |
| Structural Support | Number of support poles or branches | Minimum 3 strong poles for frame | Ensures stability of shelter |
| Waterproofing | Material coverage to prevent water entry | Complete coverage with tarp, bark, or leaves | Essential for keeping dry |
| Fire Safety Distance | Distance from shelter to fire pit | Minimum 3 meters | Reduces risk of fire spreading |
| Build Time | Estimated time to construct shelter | 2-4 hours depending on materials and team size | Plan accordingly for daylight and weather |
As night comes & temperatures fall, this early warmth can help keep your core temperature up longer. Also, facing your shelter’s entrance to the east lets you get the first rays of morning sun. This can boost your spirits, warm the inside of your shelter quickly, and help dry out any dampness from the night. Think of it as nature’s alarm clock and heater combined.
**Building Your Shelter**
Once you have chosen your ideal spot, the next step is to build your shelter. Time is often critical, especially if darkness or bad weather is near.
When planning to build an emergency shelter outdoors, it’s essential to consider various factors such as location, materials, and environmental conditions. A well-constructed shelter can provide crucial protection from the elements, ensuring safety and comfort. For those interested in enhancing their outdoor survival skills, you might find it helpful to read more about essential gear in this informative article on camp LED rechargeable lights, which can significantly improve visibility and safety during nighttime emergencies.
The goal is not a permanent home, but a useful, protective space that can be set up quickly with few tools, mainly using what nature provides or what you have in your emergency kit.
**The Power of “Small and Insulated”**
This is a key idea in survival shelter building: keep it small. Build your shelter just big enough for you to lie down in comfortably. Any extra empty space inside your shelter is space you will have to heat with your body warmth, and that heat will quickly be lost.
A snug fit means a warm fit. Once you have the basic frame, the real work of insulation starts. This is where you bring in debris. Gather as many dry leaves, pine needles, moss, grass, and brush as you can find. Aim for a thick layer—ideally six to twelve inches or more—both on the floor and inside the walls.
This debris traps air and prevents heat loss. Crucially, pile a thick layer of this insulation under your body. The ground steals body heat, constantly drawing warmth away through contact.
A thick bed of leaves or other natural materials creates a barrier, greatly reducing this heat loss and helping you keep your core temperature through the night. If you have extra clothes, blankets, or even a space blanket, use these as extra insulation inside your debris bed or over yourself.
**Rapid Construction Methods & Materials**
Your main goal is to create windproof cover quickly. Several simple designs work well for fast building.
– **Lean-to:** This is probably the easiest & fastest.
Find a sturdy fallen log, a large rock, or two trees close enough to hold a main support branch. Lean smaller branches against this support at an angle, making a sloped roof. Cover these with leaves, pine boughs, bark, or any debris available to create a solid, wind-resistant wall. This works best when you face the open side away from the wind.
– **A-frame:** A bit more complex but offering more enclosed space.
You need a long, sturdy ridge pole supported by two upright poles (or between two trees). Then, lean smaller branches along both sides of the ridge pole, forming an “A” shape. Cover these with thick layers of debris.
– **Debris Shelter:** This is the most basic but very effective. It often starts with a small A-frame or lean-to frame, but most of its protection comes from a very thick layer of insulating debris.
You basically create a mound of leaves, branches, and other natural materials over a small inner frame, forming a sort of natural cocoon. The thicker the debris, the better the insulation.
– **Tarp/Poncho Shelter:** If you have a tarp, poncho, or even a large heavy-duty garbage bag, you have a big advantage. These items provide instant waterproof and windproof cover. You can string a tarp between trees to make an A-frame or lean-to, or just drape it over a fallen log.
Use rope, cordage, or even strips of bark to secure it. Make sure it has a slight slope to shed water. If using a poncho, you can often button or tie it into a makeshift tube shelter or drape it over a frame. Whatever method you choose, your final step, if materials allow, should be to add a thick outer layer to shed wind & moisture.
This could be larger pieces of bark, tightly woven branches, or more compacted debris. The goal is to create a barrier that deflects wind & stops rain from soaking your insulating layers.
**Using Available Resources**
In a survival situation, your ability to make do is your greatest strength. You probably won’t have a full toolkit, so learning to use what is around you—both in nature and in your pockets—is crucial. Every item you carry, & every natural material you find, has potential use.
**Everyday Items as Survival Tools**
Do not underestimate the value of ordinary items you might have on you or in a daypack.
– **Tarps, Space Blankets, and Bivy Sacks:** If you have one of these, you have a big head start.
A tarp provides instant waterproof cover and can be set up in different shelter shapes. A space blanket reflects heat well, trapping your body warmth—use it inside your debris shelter for extra warmth, or as a windbreak. A bivy sack is a small, lightweight shelter that offers immediate protection from wind and light rain.
– **Garbage Bags:** A heavy-duty garbage bag is very versatile.
You can cut it open & use it as a makeshift tarp for overhead cover. You can also get inside a large bag to create an immediate wind and moisture barrier (but watch out for condensation inside). Multiple bags can be taped or tied together to form a larger sheet.
– **Rope/Cordage:** Even a short piece of rope or paracord is valuable. Use it to secure tarps, tie down branches for your shelter frame, or make lashings.
If you don’t have rope, look for natural cordage options like inner bark from certain trees (e.g., cedar, basswood), long tough grasses, or strips of durable clothing.
– **Clothing:** Beyond wearing it for warmth, extra clothes can be used as insulation inside your shelter, especially under your body. A spare jacket or even socks can be stuffed into gaps to block drafts.
– **Knives/Multi-tools:** A knife is essential for cutting branches, preparing cordage, or working with other materials. If you don’t have one, sharp rocks or broken pieces of flint can serve as basic cutting tools.
**Natural Materials for Shelter and Insulation**
Nature provides plenty of resources if you know what to look for.
– **Bark:** Large sheets of bark, especially from fallen trees, can be used as roofing to shed water or as windproof siding. Birch bark is especially good because it is waterproof.
– **Moss:** Thick beds of moss can be great insulators, especially on the ground or packed into gaps in your shelter.
– **Branches & Logs:** These form the main structure of most makeshift shelters. Look for sturdy branches for your main supports and smaller, straighter ones for ribs and crossbeams.
Fallen logs can be used as a natural wall or base.
– **Leaves, Pine Needles, Grasses:** These are your main insulating materials. Collect huge amounts to create a thick, warm bed and to fill gaps in your shelter walls. Dry materials are key; wet leaves offer little insulation.
– **Evergreen Boughs:** Pine, spruce, and fir boughs provide decent insulation & can also be used as a dense outer layer to shed rain and block wind, though they are not fully waterproof. Remember, the key is to be observant and creative. Every material you come across can help make your shelter warmer and more protective.
FAQs
What materials are essential for building an emergency shelter outdoors?
Essential materials for building an emergency shelter outdoors include a tarp or emergency blanket, paracord or rope, a knife or multi-tool, and natural materials such as branches or leaves for insulation.
How can I choose a suitable location for building an emergency shelter outdoors?
When selecting a location for your emergency shelter, look for flat ground away from potential hazards like falling rocks or flooding areas. Make sure the spot is easily visible for rescuers and close to a water source if possible.
What are some common types of emergency shelters that can be built outdoors?
Common types of emergency shelters include lean-tos, A-frame shelters, debris huts, and tarp shelters. Each type offers different levels of protection and requires varying amounts of time and resources to build.
How can I stay warm in an emergency shelter built outdoors?
To stay warm in an emergency shelter outdoors, insulate the shelter with natural materials like leaves or pine boughs. Use a reflective emergency blanket to trap body heat, and consider building a small fire outside the shelter if conditions allow.
What are some important safety tips to keep in mind when building an emergency shelter outdoors?
Important safety tips for building an emergency shelter outdoors include avoiding building near cliffs or unstable terrain, checking the weather forecast before starting construction, and always having a communication device like a whistle or signaling mirror on hand.
Gear Up for Your Next Adventure
Shop related gear from Outdoor Survivors:



No comment